> ## Documentation Index
> Fetch the complete documentation index at: https://docs.sellagent.ai/llms.txt
> Use this file to discover all available pages before exploring further.
# Connect Google Tag Manager to your Sell Page
> Add many tracking pixels and tags to your Sell Page from one place — TikTok, LinkedIn, Google Ads and more. No coding needed.
**Google Tag Manager (GTM)** is a free Google tool that holds all your tracking codes in one place, called a **container**.
Connect the container to your Sell Page once. After that you can add, change or remove tags (TikTok Pixel, LinkedIn, Google Ads, a second Meta Pixel…) inside Tag Manager, **without touching your Sell Page again**.
**You need:** a Google account (for example your Gmail). It takes about **5 minutes**.
**Only need one Meta Pixel or Google Analytics?** Use the simpler [Meta Pixel](/pages/meta-pixel) or [Google Analytics 4](/pages/google-analytics) guides instead. Tag Manager is for when you need **more than one** tag.
## Part 1: Get your Container ID from Google
Go to **[tagmanager.google.com](https://tagmanager.google.com)**, sign in with your Google account and click **Create account**.
No Google account yet? [Create one for free](https://accounts.google.com/signup) — a Gmail address works.
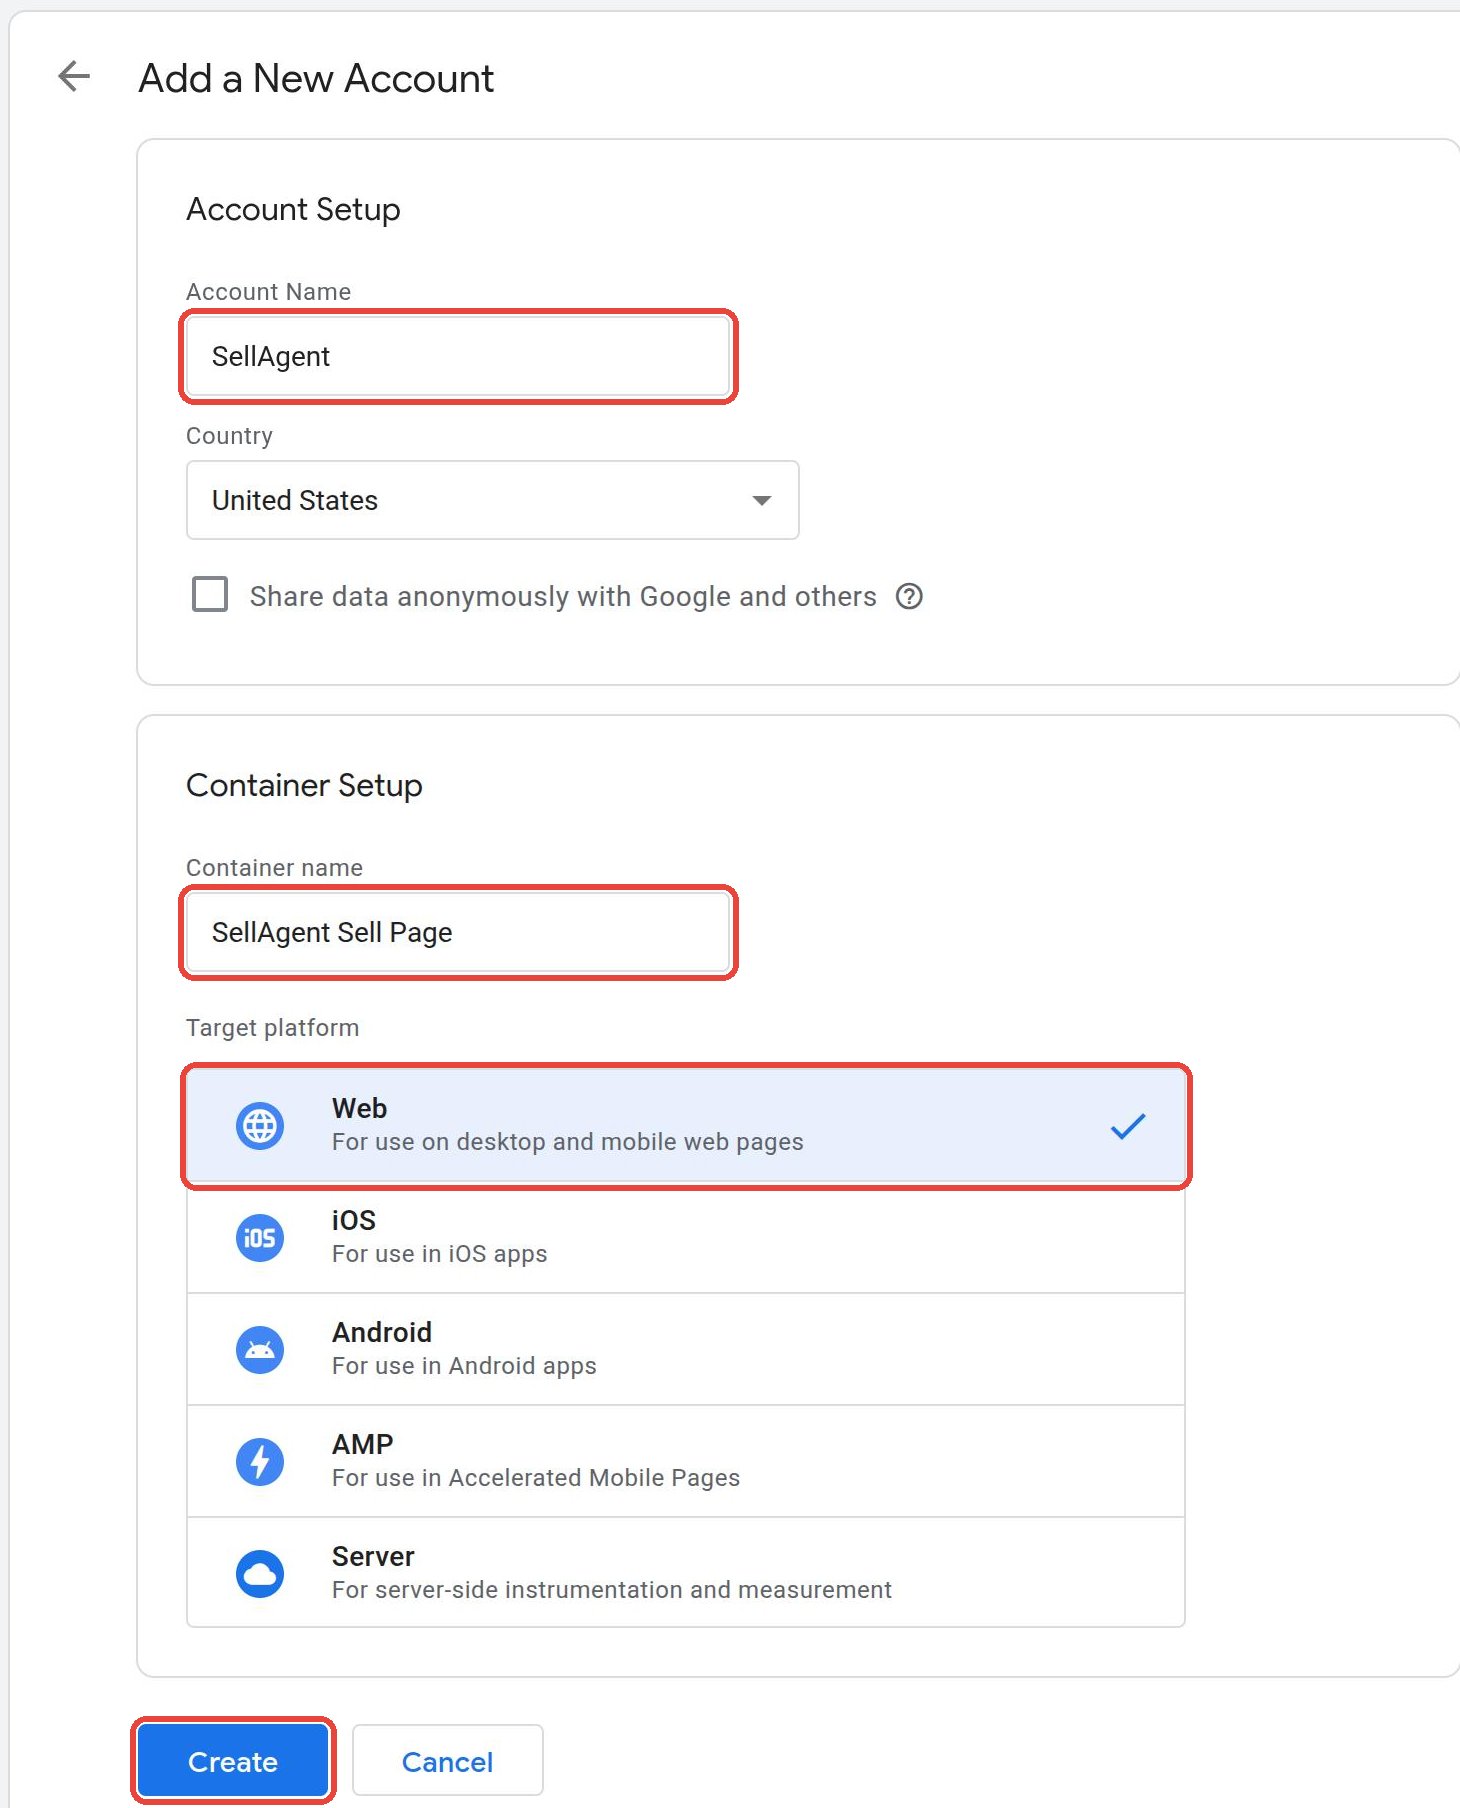
Fill in the **Add a New Account** form:
| Field | What to type |
| - | - |
| **Account Name** | Your business name, for example `SellAgent` |
| **Country** | Your country |
| **Container name** | `SellAgent Sell Page` (it's only a label) |
| **Target platform** | Click **Web** |
Leave **Share data anonymously** unticked, then click **Create**.
 A window with Google's terms opens. Tick the box at the bottom (it may mention the **GDPR**) and click **Yes** at the top right.
Google shows a window with two pieces of code. **You don't need them** — SellAgent adds the code for you. Click **OK** to close it.
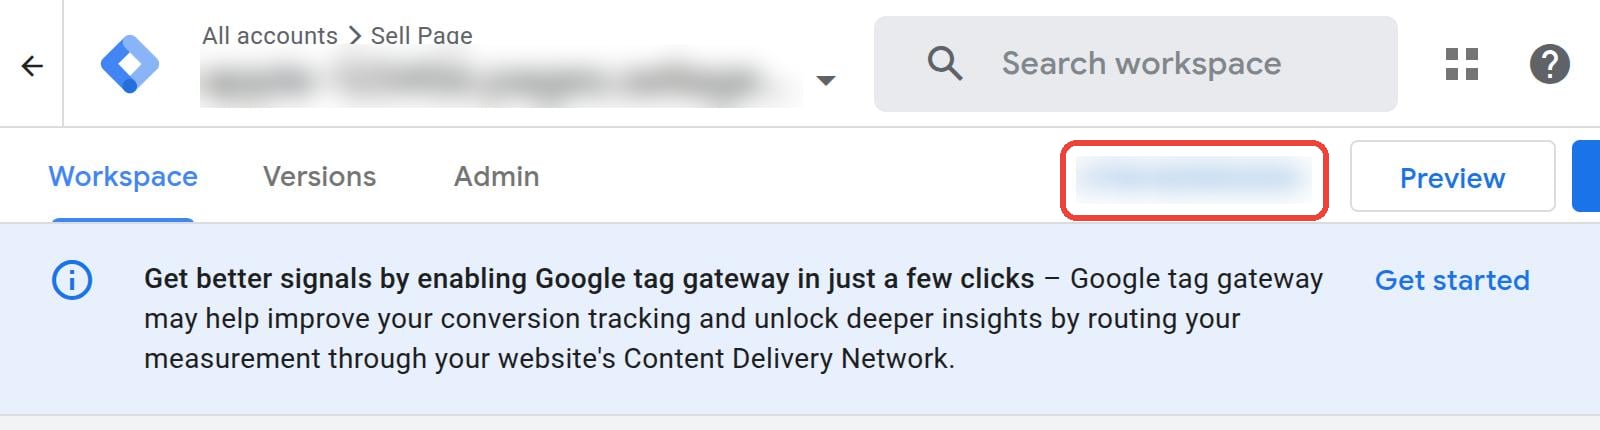
You are now in your container's **Workspace**. At the top, just left of **Workspace Changes**, you will see your **Container ID** (inside the red box below). It starts with **GTM-**, for example `GTM-AB12CD3`. Select it and copy it.
A window with Google's terms opens. Tick the box at the bottom (it may mention the **GDPR**) and click **Yes** at the top right.
Google shows a window with two pieces of code. **You don't need them** — SellAgent adds the code for you. Click **OK** to close it.
You are now in your container's **Workspace**. At the top, just left of **Workspace Changes**, you will see your **Container ID** (inside the red box below). It starts with **GTM-**, for example `GTM-AB12CD3`. Select it and copy it.
 ## Part 2: Add the Container ID to your Sell Page
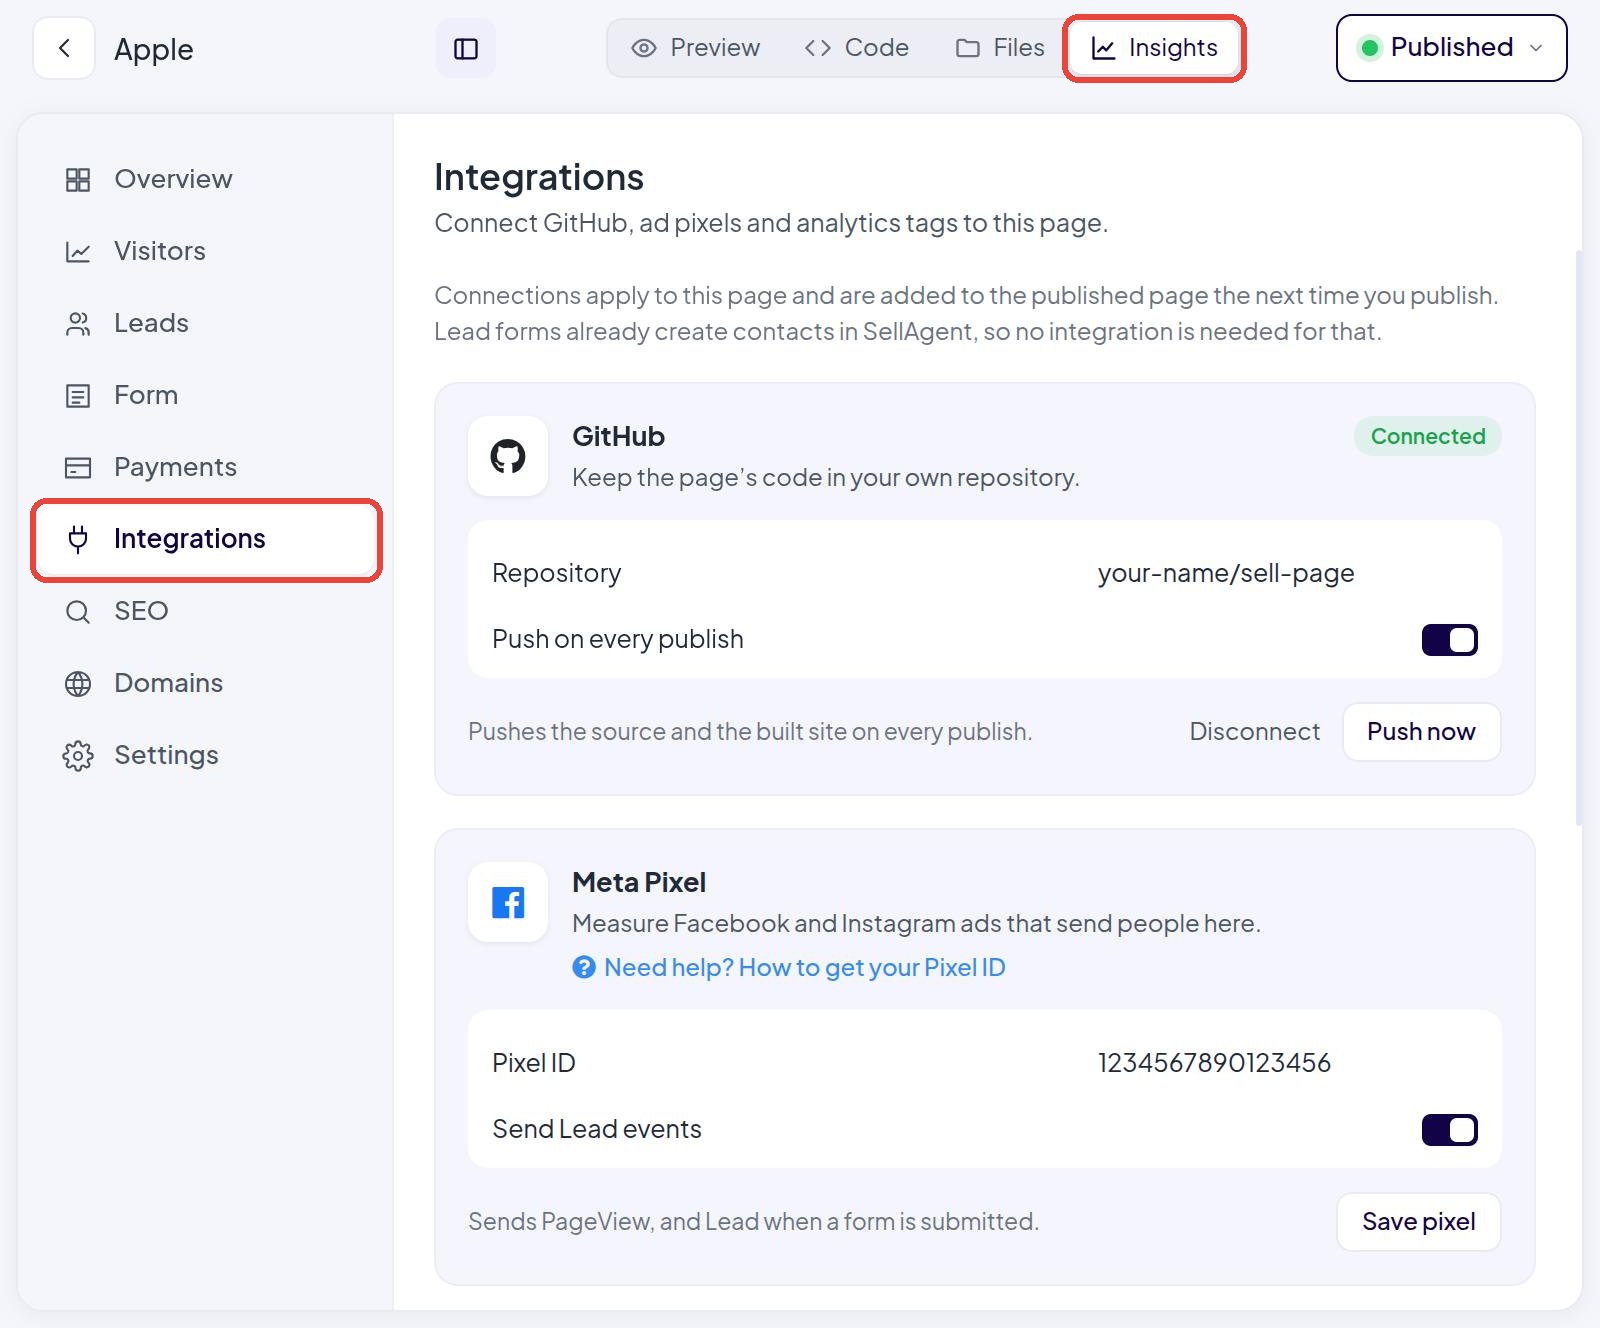
In SellAgent, open your Sell Page. Click **Insights** at the top, then **Integrations** on the left.
## Part 2: Add the Container ID to your Sell Page
In SellAgent, open your Sell Page. Click **Insights** at the top, then **Integrations** on the left.
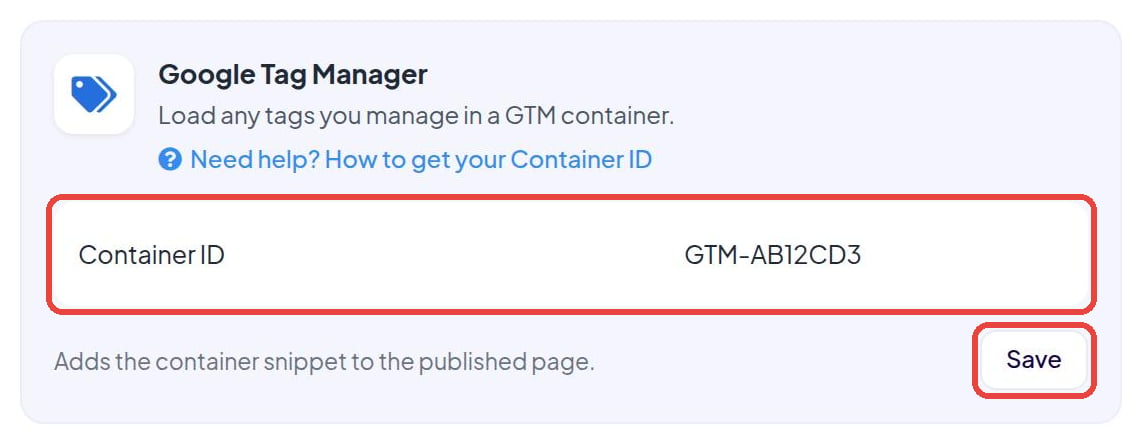
 In the **Google Tag Manager** card, paste your ID into **Container ID** and click **Save**.
 The card now shows a green **Connected** label.
Click **Publish** (or **Republish**) at the top right. Tag Manager only loads on your live page after you publish.
## Part 3: Check that it works
In Tag Manager, click **Preview** at the top right. Type your live Sell Page address and click **Connect**.
Your page opens in a new tab and **Tag Assistant** shows what happens on it. You should see your container ID and events like **Container Loaded** and **DOM Ready**.
Fill in your page's lead form — a **sellagent\_lead** event appears in the list.
A new container is **empty**, so Tag Assistant says “No tags were evaluated”. That's normal — it means Tag Manager is connected and waiting for you to add tags.
## Part 4: Add your tags
Everything you add here goes live on your Sell Page — no need to publish your page again.
In Tag Manager, click **Tags → New**. Choose the tag type (for example **Google Ads Conversion Tracking**, **TikTok Pixel** from the Community Template Gallery, or **Custom HTML** for any code a platform gives you).
Under **Triggering**, pick:
* **All Pages** — to count every visit.
* **SellAgent lead** — to count form sign-ups (see below).
Click **Submit** at the top right, then **Publish**. Your tags are now live.
### Count leads from your Sell Page form
Every time someone sends your page's lead form, SellAgent tells Tag Manager with an event called **`sellagent_lead`**. To use it:
1. Go to **Triggers → New** and click **Trigger Configuration**.
2. Choose **Custom Event**.
3. In **Event name**, type exactly:
```text theme={null}
sellagent_lead
```
4. At the top, click **Untitled Trigger** and rename it to `SellAgent lead`.
5. Click **Save**.
The card now shows a green **Connected** label.
Click **Publish** (or **Republish**) at the top right. Tag Manager only loads on your live page after you publish.
## Part 3: Check that it works
In Tag Manager, click **Preview** at the top right. Type your live Sell Page address and click **Connect**.
Your page opens in a new tab and **Tag Assistant** shows what happens on it. You should see your container ID and events like **Container Loaded** and **DOM Ready**.
Fill in your page's lead form — a **sellagent\_lead** event appears in the list.
A new container is **empty**, so Tag Assistant says “No tags were evaluated”. That's normal — it means Tag Manager is connected and waiting for you to add tags.
## Part 4: Add your tags
Everything you add here goes live on your Sell Page — no need to publish your page again.
In Tag Manager, click **Tags → New**. Choose the tag type (for example **Google Ads Conversion Tracking**, **TikTok Pixel** from the Community Template Gallery, or **Custom HTML** for any code a platform gives you).
Under **Triggering**, pick:
* **All Pages** — to count every visit.
* **SellAgent lead** — to count form sign-ups (see below).
Click **Submit** at the top right, then **Publish**. Your tags are now live.
### Count leads from your Sell Page form
Every time someone sends your page's lead form, SellAgent tells Tag Manager with an event called **`sellagent_lead`**. To use it:
1. Go to **Triggers → New** and click **Trigger Configuration**.
2. Choose **Custom Event**.
3. In **Event name**, type exactly:
```text theme={null}
sellagent_lead
```
4. At the top, click **Untitled Trigger** and rename it to `SellAgent lead`.
5. Click **Save**.
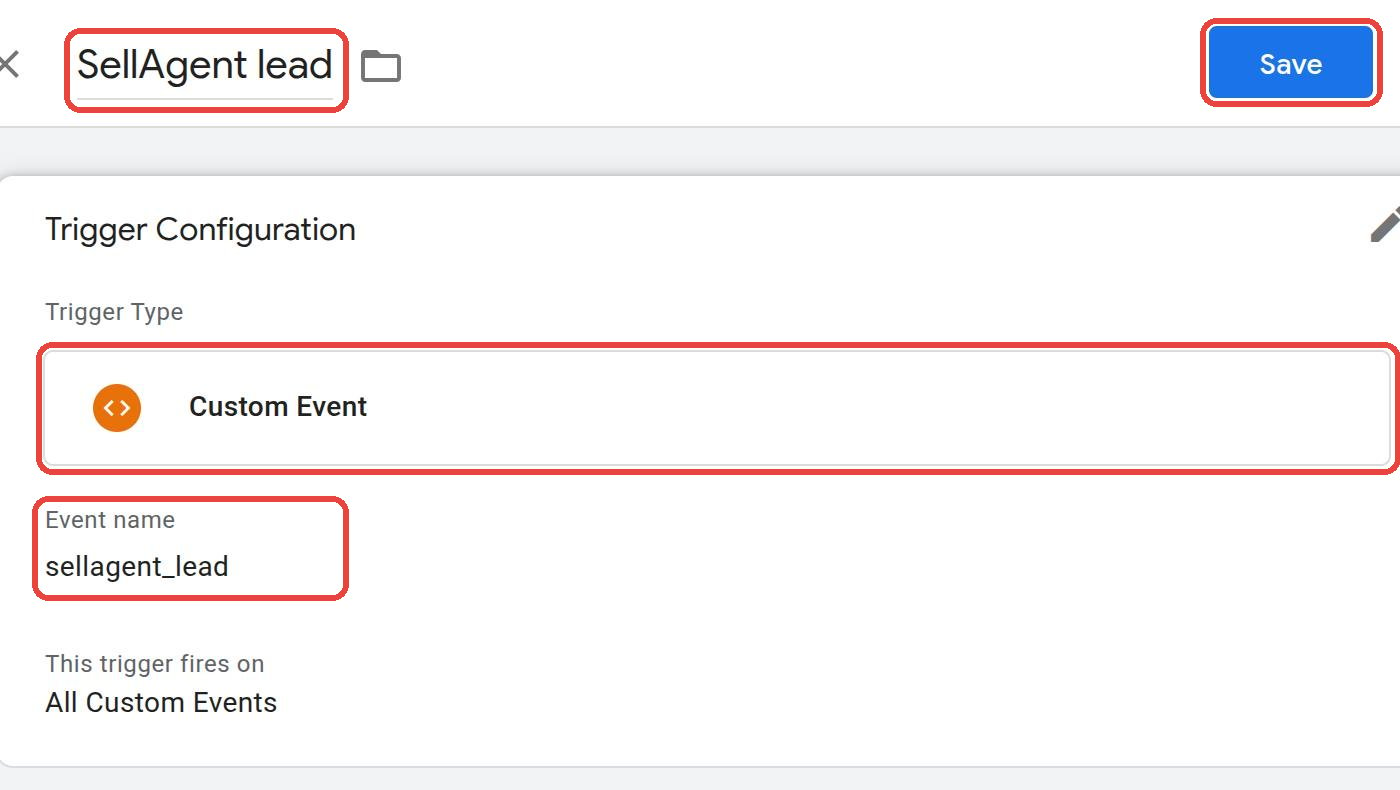 Now pick this trigger on any tag you want to fire when someone becomes a lead — for example a Google Ads conversion or a TikTok “Submit form” event.
## Common questions
Copy only the ID that starts with **GTM-** (for example `GTM-AB12CD3`), not the code Google showed you.
* Make sure you clicked **Publish** in SellAgent after saving the ID.
* Click **Submit → Publish** in Tag Manager at least once.
* The quality check can take up to a day to update. **Preview** mode shows it working straight away.
Only if you **don't** add Google Analytics inside Tag Manager. Using both counts every visit twice.
No. Changes you **Submit → Publish** in Tag Manager go live on their own. You only publish your Sell Page once, after saving the Container ID.
This documentation is built and hosted on [Mintlify](https://mintlify.com), a developer documentation platform.
Now pick this trigger on any tag you want to fire when someone becomes a lead — for example a Google Ads conversion or a TikTok “Submit form” event.
## Common questions
Copy only the ID that starts with **GTM-** (for example `GTM-AB12CD3`), not the code Google showed you.
* Make sure you clicked **Publish** in SellAgent after saving the ID.
* Click **Submit → Publish** in Tag Manager at least once.
* The quality check can take up to a day to update. **Preview** mode shows it working straight away.
Only if you **don't** add Google Analytics inside Tag Manager. Using both counts every visit twice.
No. Changes you **Submit → Publish** in Tag Manager go live on their own. You only publish your Sell Page once, after saving the Container ID.
This documentation is built and hosted on [Mintlify](https://mintlify.com), a developer documentation platform.