> ## Documentation Index
> Fetch the complete documentation index at: https://docs.sellagent.ai/llms.txt
> Use this file to discover all available pages before exploring further.
# Outbound Calls
> A Step-by-step guide to making outbound phone calls using **Sell Agent** imported numbers.
Before you begin, ensure you've already purchased and imported phone numbers from Twilio by following the previous setup guides.
## 🔗 Bind Voice Agents
To enable calling, you **must bind a voice agent to the number**.\
Without an assigned agent, the number cannot make or receive calls.
* You can assign different agents for **inbound** and **outbound** calls.
* To disable inbound or outbound:
* Leave `inboundAgentId` or `outboundAgentId` unset.
* Example: If you only want to make calls but not receive callbacks, leave `inboundAgentId` unset.
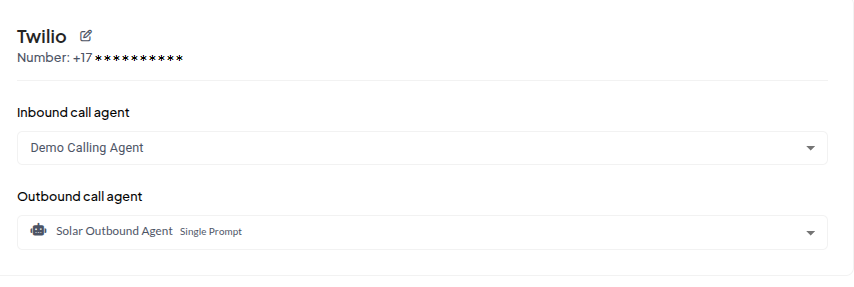 Once an inbound agent is assigned, inbound calls will begin working automatically.
## ☎️ Make Outbound Call
You can initiate outbound calls using the ****[Create Phone Number API](/api-reference/phone/create)**** or all the parameters you can use.
* `phoneId` : The internal ID of the phone number you imported or purchased and registered in **Sell Agent**.
* `phoneNumber` : The destination number you want to call, in E.164 format (e.g., +12135551234).
* `agentId` : The ID of the AI agent that should handle the call. This is the agent that will speak on the call.
```js theme={null}
const options = {
method: 'POST',
headers: {
'x-api-key': '',
'Content-Type': 'application/json'
},
body: JSON.stringify({
phoneId: "",
phoneNumber: "+14155551234",
agentId: ""
})
};
fetch('https://server.sellagent.ai/api/phone/createCall', options)
.then(response => response.json())
.then(response => console.log(response))
.catch(err => console.error(err));
```
```python theme={null}
import requests
url = "https://server.sellagent.ai/api/phone/createCall"
payload = {
"phoneId": "",
"phoneNumber": "+14155551234",
"agentId": ""
}
headers = {
"x-api-key": "",
"Content-Type": "application/json"
}
response = requests.post(url, json=payload, headers=headers)
print(response.text)
```
## 🔄 Add Webhook for Post-call Events
You can optionally set a `webhookURL` in your agent configuration. This webhook is triggered **after each call ends**, sending the full call transcript and other metadata to your server.
### 🛠️ Option 1: Programmatically
Set the webhook when creating or updating the agent:
```json theme={null}
"webhookURL": "https://example.com/webhook"
```
### ⚙️ Option 2: Through Agent Settings UI
You can also configure the webhook directly in the dashboard under Agent Settings:
Once an inbound agent is assigned, inbound calls will begin working automatically.
## ☎️ Make Outbound Call
You can initiate outbound calls using the ****[Create Phone Number API](/api-reference/phone/create)**** or all the parameters you can use.
* `phoneId` : The internal ID of the phone number you imported or purchased and registered in **Sell Agent**.
* `phoneNumber` : The destination number you want to call, in E.164 format (e.g., +12135551234).
* `agentId` : The ID of the AI agent that should handle the call. This is the agent that will speak on the call.
```js theme={null}
const options = {
method: 'POST',
headers: {
'x-api-key': '',
'Content-Type': 'application/json'
},
body: JSON.stringify({
phoneId: "",
phoneNumber: "+14155551234",
agentId: ""
})
};
fetch('https://server.sellagent.ai/api/phone/createCall', options)
.then(response => response.json())
.then(response => console.log(response))
.catch(err => console.error(err));
```
```python theme={null}
import requests
url = "https://server.sellagent.ai/api/phone/createCall"
payload = {
"phoneId": "",
"phoneNumber": "+14155551234",
"agentId": ""
}
headers = {
"x-api-key": "",
"Content-Type": "application/json"
}
response = requests.post(url, json=payload, headers=headers)
print(response.text)
```
## 🔄 Add Webhook for Post-call Events
You can optionally set a `webhookURL` in your agent configuration. This webhook is triggered **after each call ends**, sending the full call transcript and other metadata to your server.
### 🛠️ Option 1: Programmatically
Set the webhook when creating or updating the agent:
```json theme={null}
"webhookURL": "https://example.com/webhook"
```
### ⚙️ Option 2: Through Agent Settings UI
You can also configure the webhook directly in the dashboard under Agent Settings:
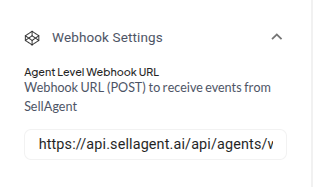 Once configured, Sell Agent will send a POST request to your webhook after every inbound or outbound call, including transcript, duration, result, and more.
To see the full list of available agent parameters, check the ****[Update Agent API](/api-reference/agent/update)****.
Once configured, Sell Agent will send a POST request to your webhook after every inbound or outbound call, including transcript, duration, result, and more.
To see the full list of available agent parameters, check the ****[Update Agent API](/api-reference/agent/update)****.